Monsterfy This Number 1
28Monsterfy This #1: Horror Doll
A bit about me
As some know I have a bit of a unique hobby…. I make what I call “Demented Decor”… this includes Horror Dolls, props, things to hang on walls, set on shelves and other items that make my friends and family worry about me. For those who care to know how I discovered this hobby I will include the story at the end of the tutorial.
To see a small collection of items I have done you can check out the Macabre Museum Thread
For this being the 1st Monsterfy This I decided to do a Horror Doll using limited easy to find (and cheap) items. This one has no external modifications other than a paint job.
What you will need:
A Porcelain Doll (I typically find them at thrift stores and on Facebook Marketplace and pride myself on never spending more than $4.00 on a single doll… in fact normally only spent $1.00 - $2.99 per doll)
Rotary tool with sanding bit and or Sandpaper ( I have a Rotary tool that hangs above my workbench that is variable speeds and uses a pedal to control speeds that cost me like $50.00… but any rotary tool will work like a Dremel or similar… Harbor Freight sells them for like $7.00 but if you don’t want that Sandpaper will work)
Dust mask and eye protection to use when sanding
Detail paint brush
Soft straight edge paint brush for blending
Soft wide paintbrush for covering large areas
(Typically find all three of these together in assorted paint brush packs for under $5.00 at Walmart or Craft Stores)
Black Acrylic Paint
White Acrylic Paint
Off White Acrylic Paint
(Cheap works fine… Most craft stores and Walmart have them for $0.50 - $2.99 per bottle… I typically use matte… better coverage in my opinion)
Mod Podge Matte (Sold at most Craft stores and Walmart for under $5.00)
High Gloss Acrylic Varnish or Mod Podge Ultra Gloss (The varnish works best in my opinion… Normally only craft stores will have it. Found near the Canvases and higher end acrylics costs about $10.00 per bottle but lasts forever… Mod Podge Ultra Gloss can be found at Craft stores and Walmart for under $5.00 and works just not as shiny)
Hair Dryer if you are impatient like me
Scrap piece of cardboard, Paper towels and/or craft paper
Step One:
Find a Doll you want to work on.
Step Two
Dismantle the accessories, outfit and remove the hair. I always save everything including the hair for other projects later. Removing the hair can be a bit of a chore. Most if not all porcelain dolls have wigs that are glued down. Carefully remove the hair and top cap from the head… normally just peel it back from the forehead back and it will come right off… sometimes the creator went a little nuts on the glue so you have to really struggle with it… just take your time and do it slowly. It will leave bits of hair and glue all over the head. To remove that just take your rotary tool and/or sandpaper and go to town until it is all gone… at the end it should look similar to this:
It is very important you use the proper safety equipment here… you must wear a mask that is designed to protect against dust and other particulates and proper eye protection. You never know the chemical makeup of the glue they used so better to be safe than sorry.
Step Three:
Use the black acrylic paint as a primer. Take the soft wide paintbrush for covering large areas Paint each porcelain piece black… This does not have to be perfect… but I always do 3 coats so the coverage is uniform. You can cut drying time down between coats by using a hair dryer.
Step Four:
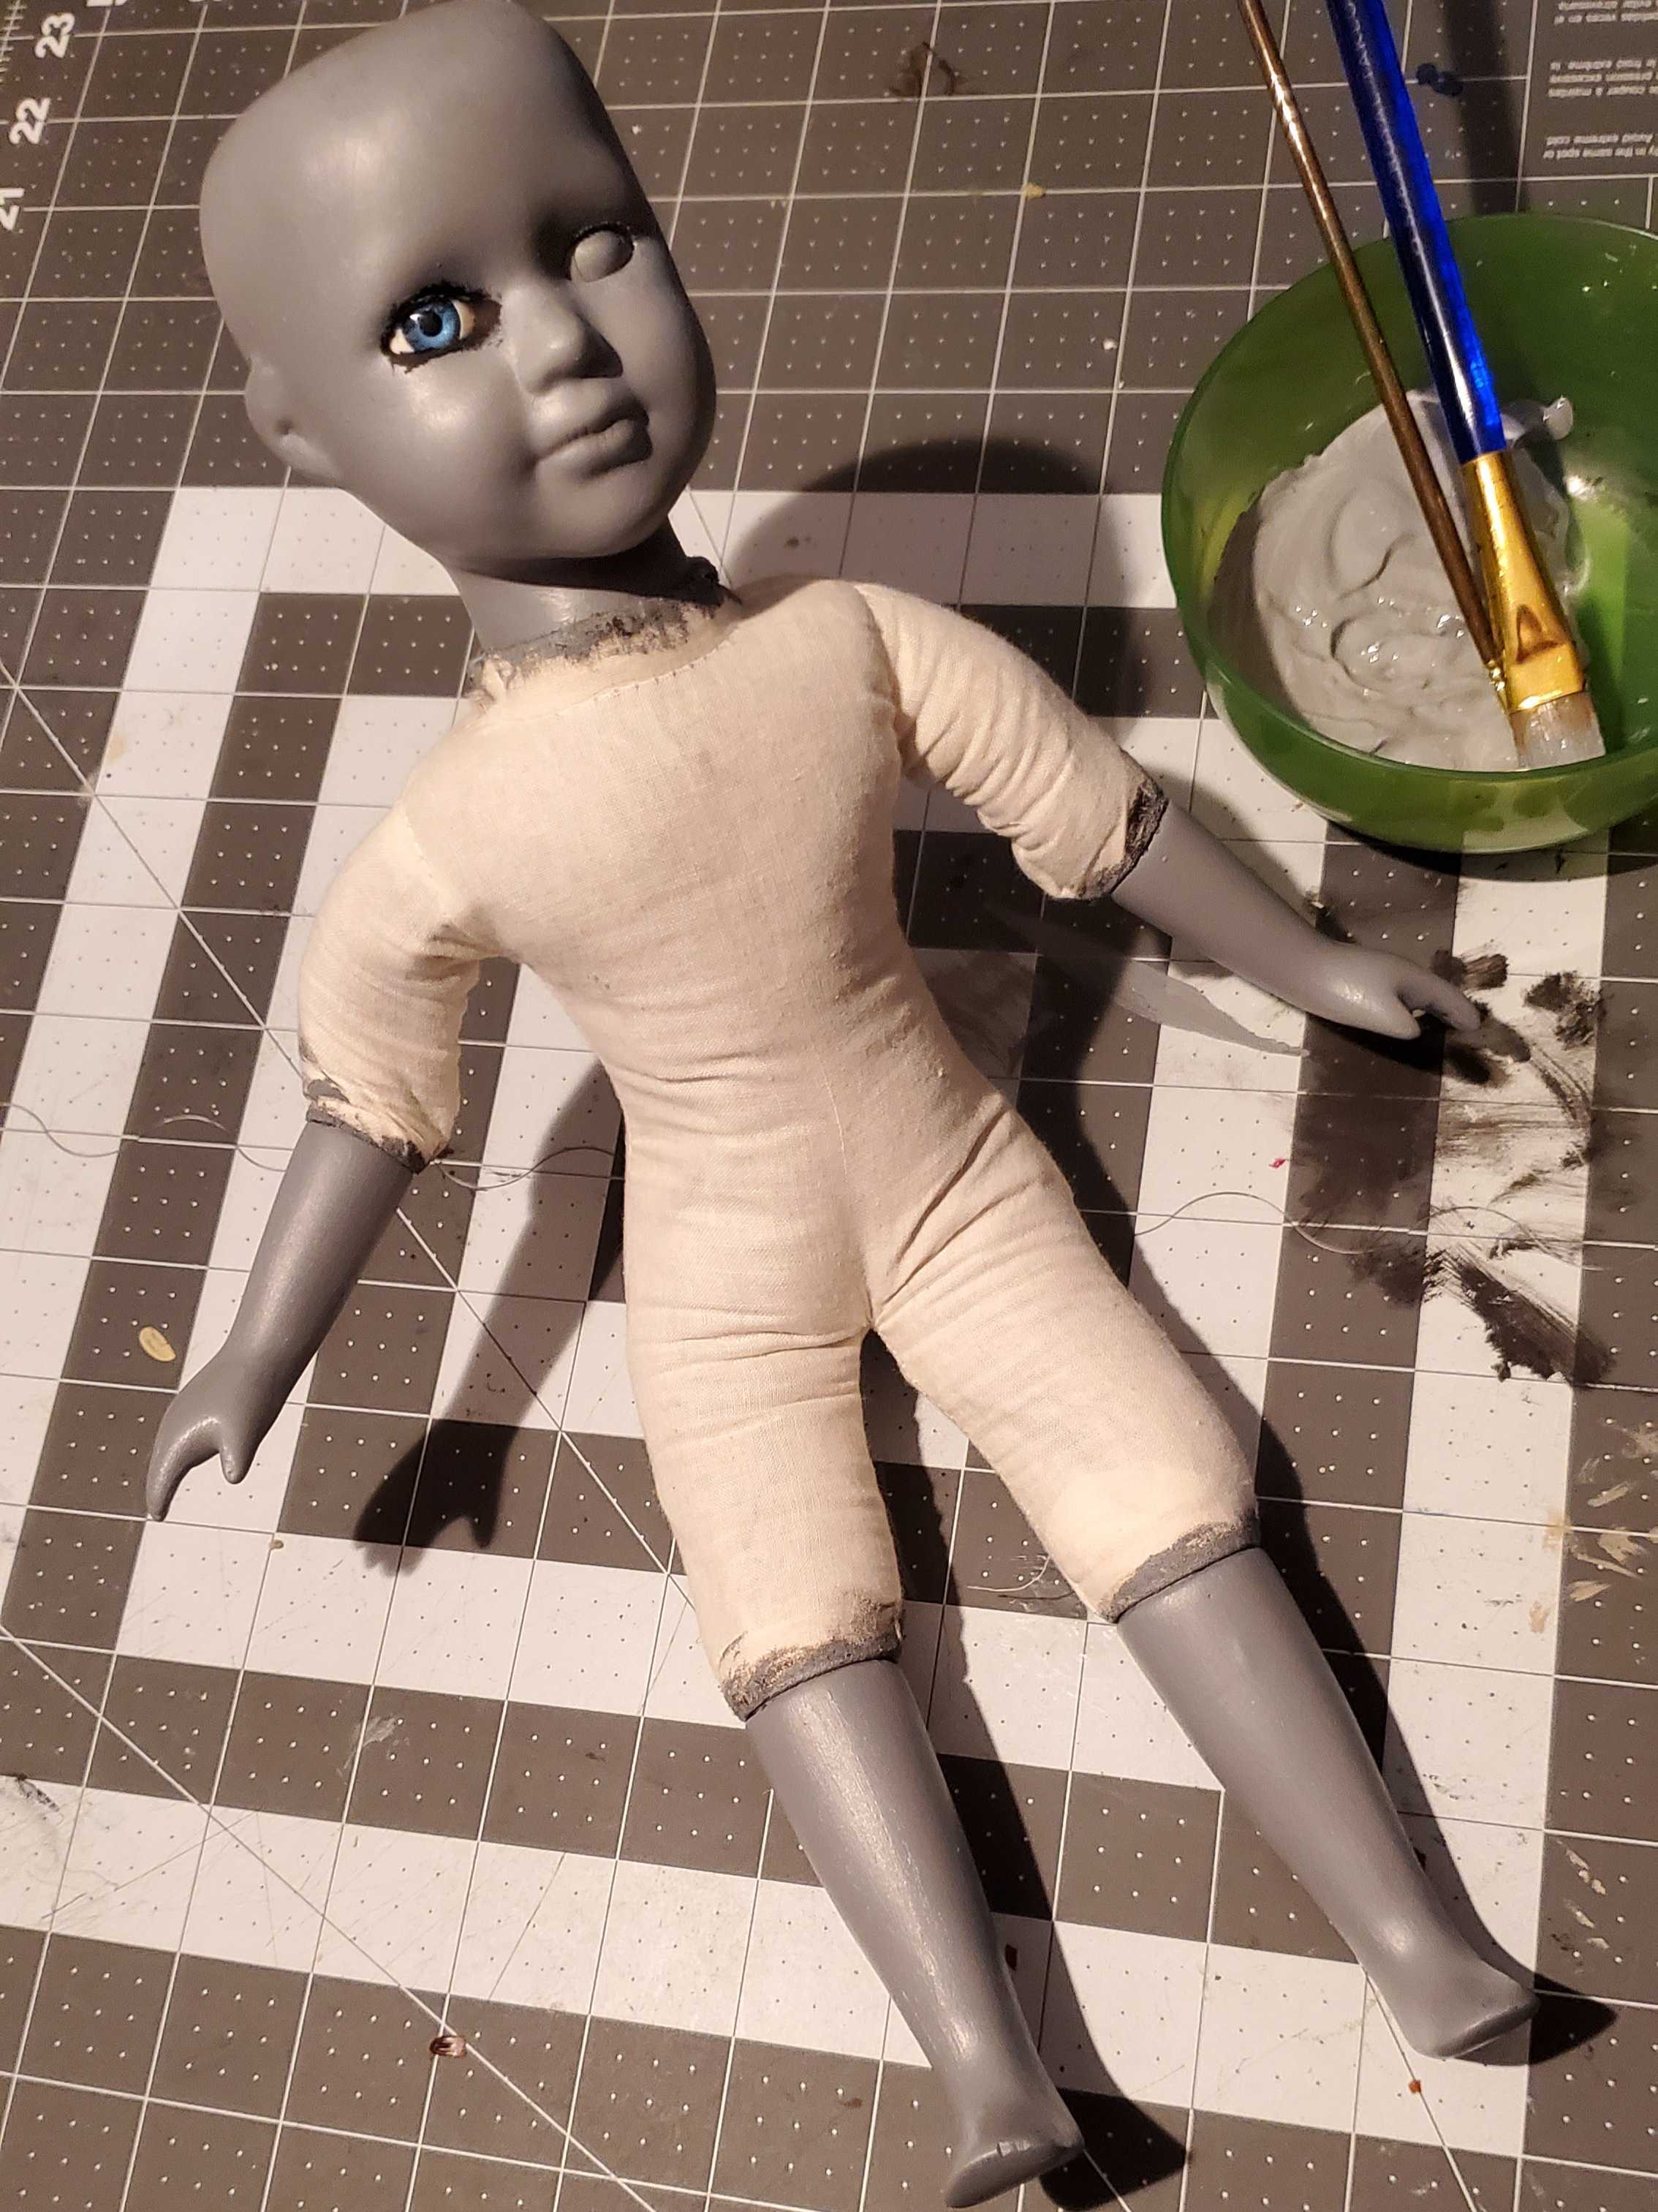
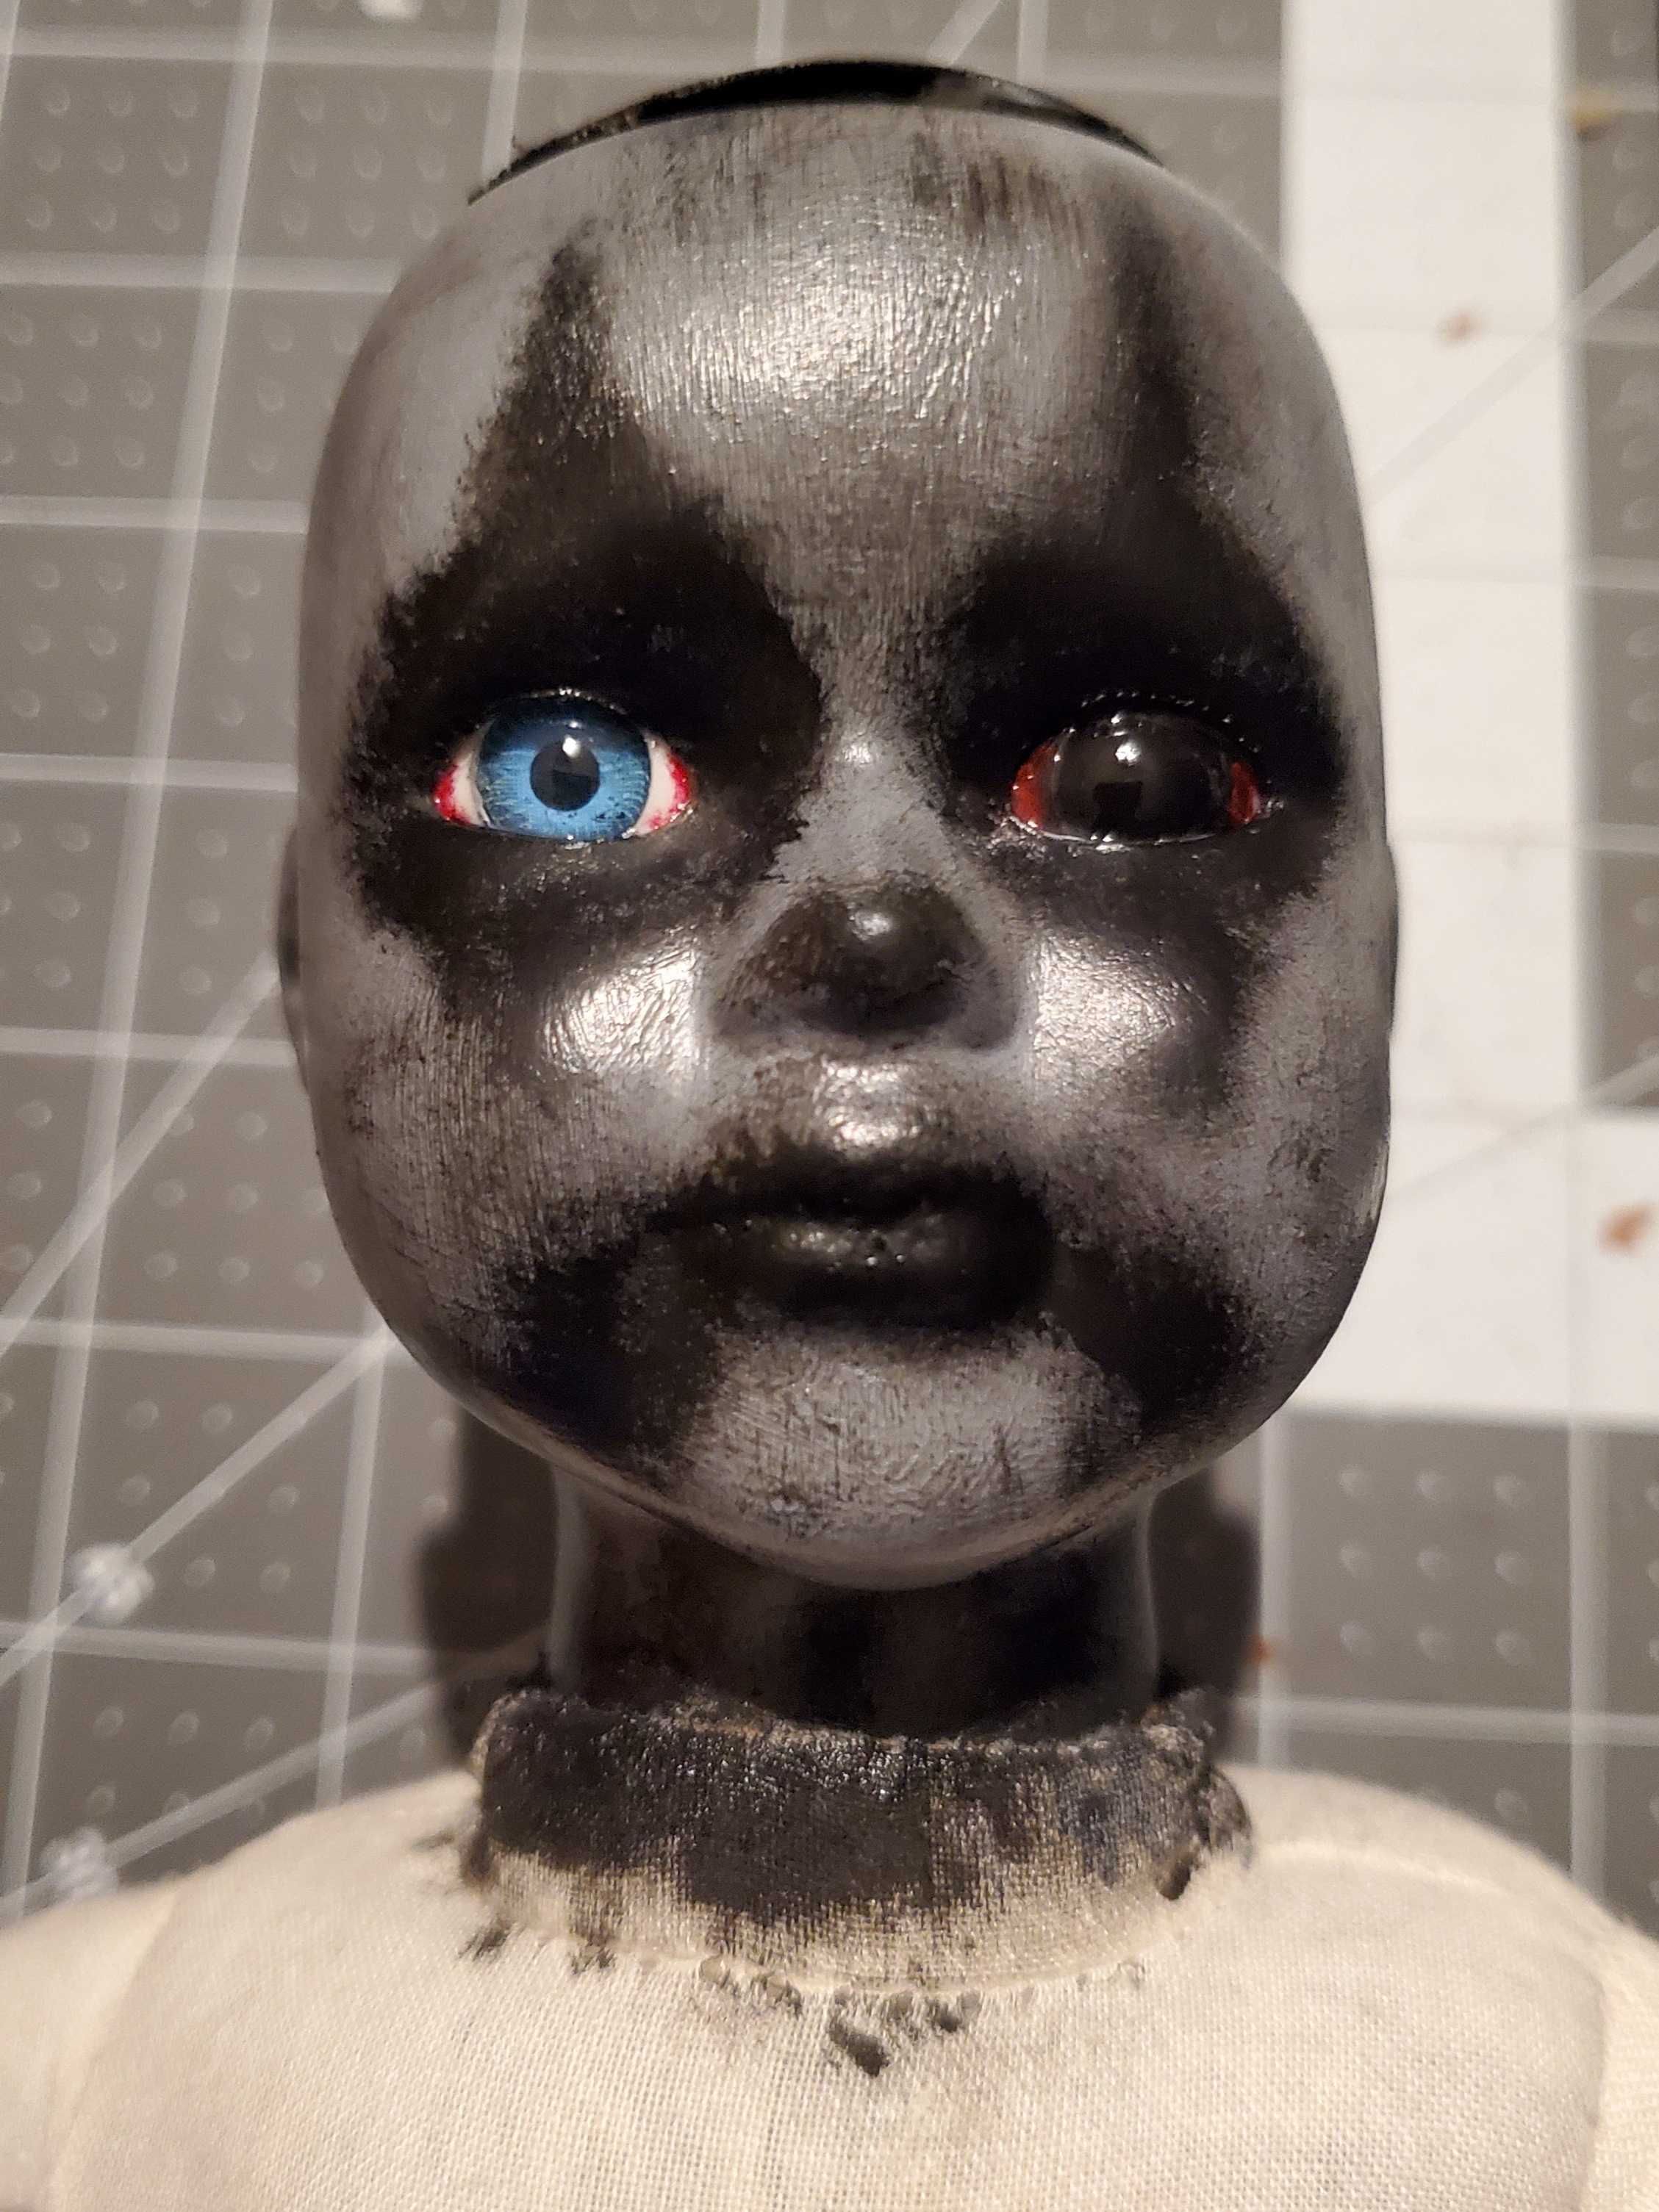
Create a grey paint by mixing the white, off white and black acrylic pains… I always start with black and slowly and mix the two white colors a little at a time until I have the color I want. So take your time mixing well… you can just buy a grey off the shelf if you want… but I typically mix my own and make it more customized. Once you have your grey use the soft wide brush (clean it with tap water before reusing) and paint every porcelain piece grey… you want it to be uniform so it will likely take 2 -3 coats… use a hair dryer in between coats if you want to lessen drying time. You can see I covered one eye with the grey because… I thought it would look cool you don’t have to or you can do both… your call.
If you want to glue the plastic cap back on it over the big hole in the head at this point you can… but you don’t have to.
Step Five:
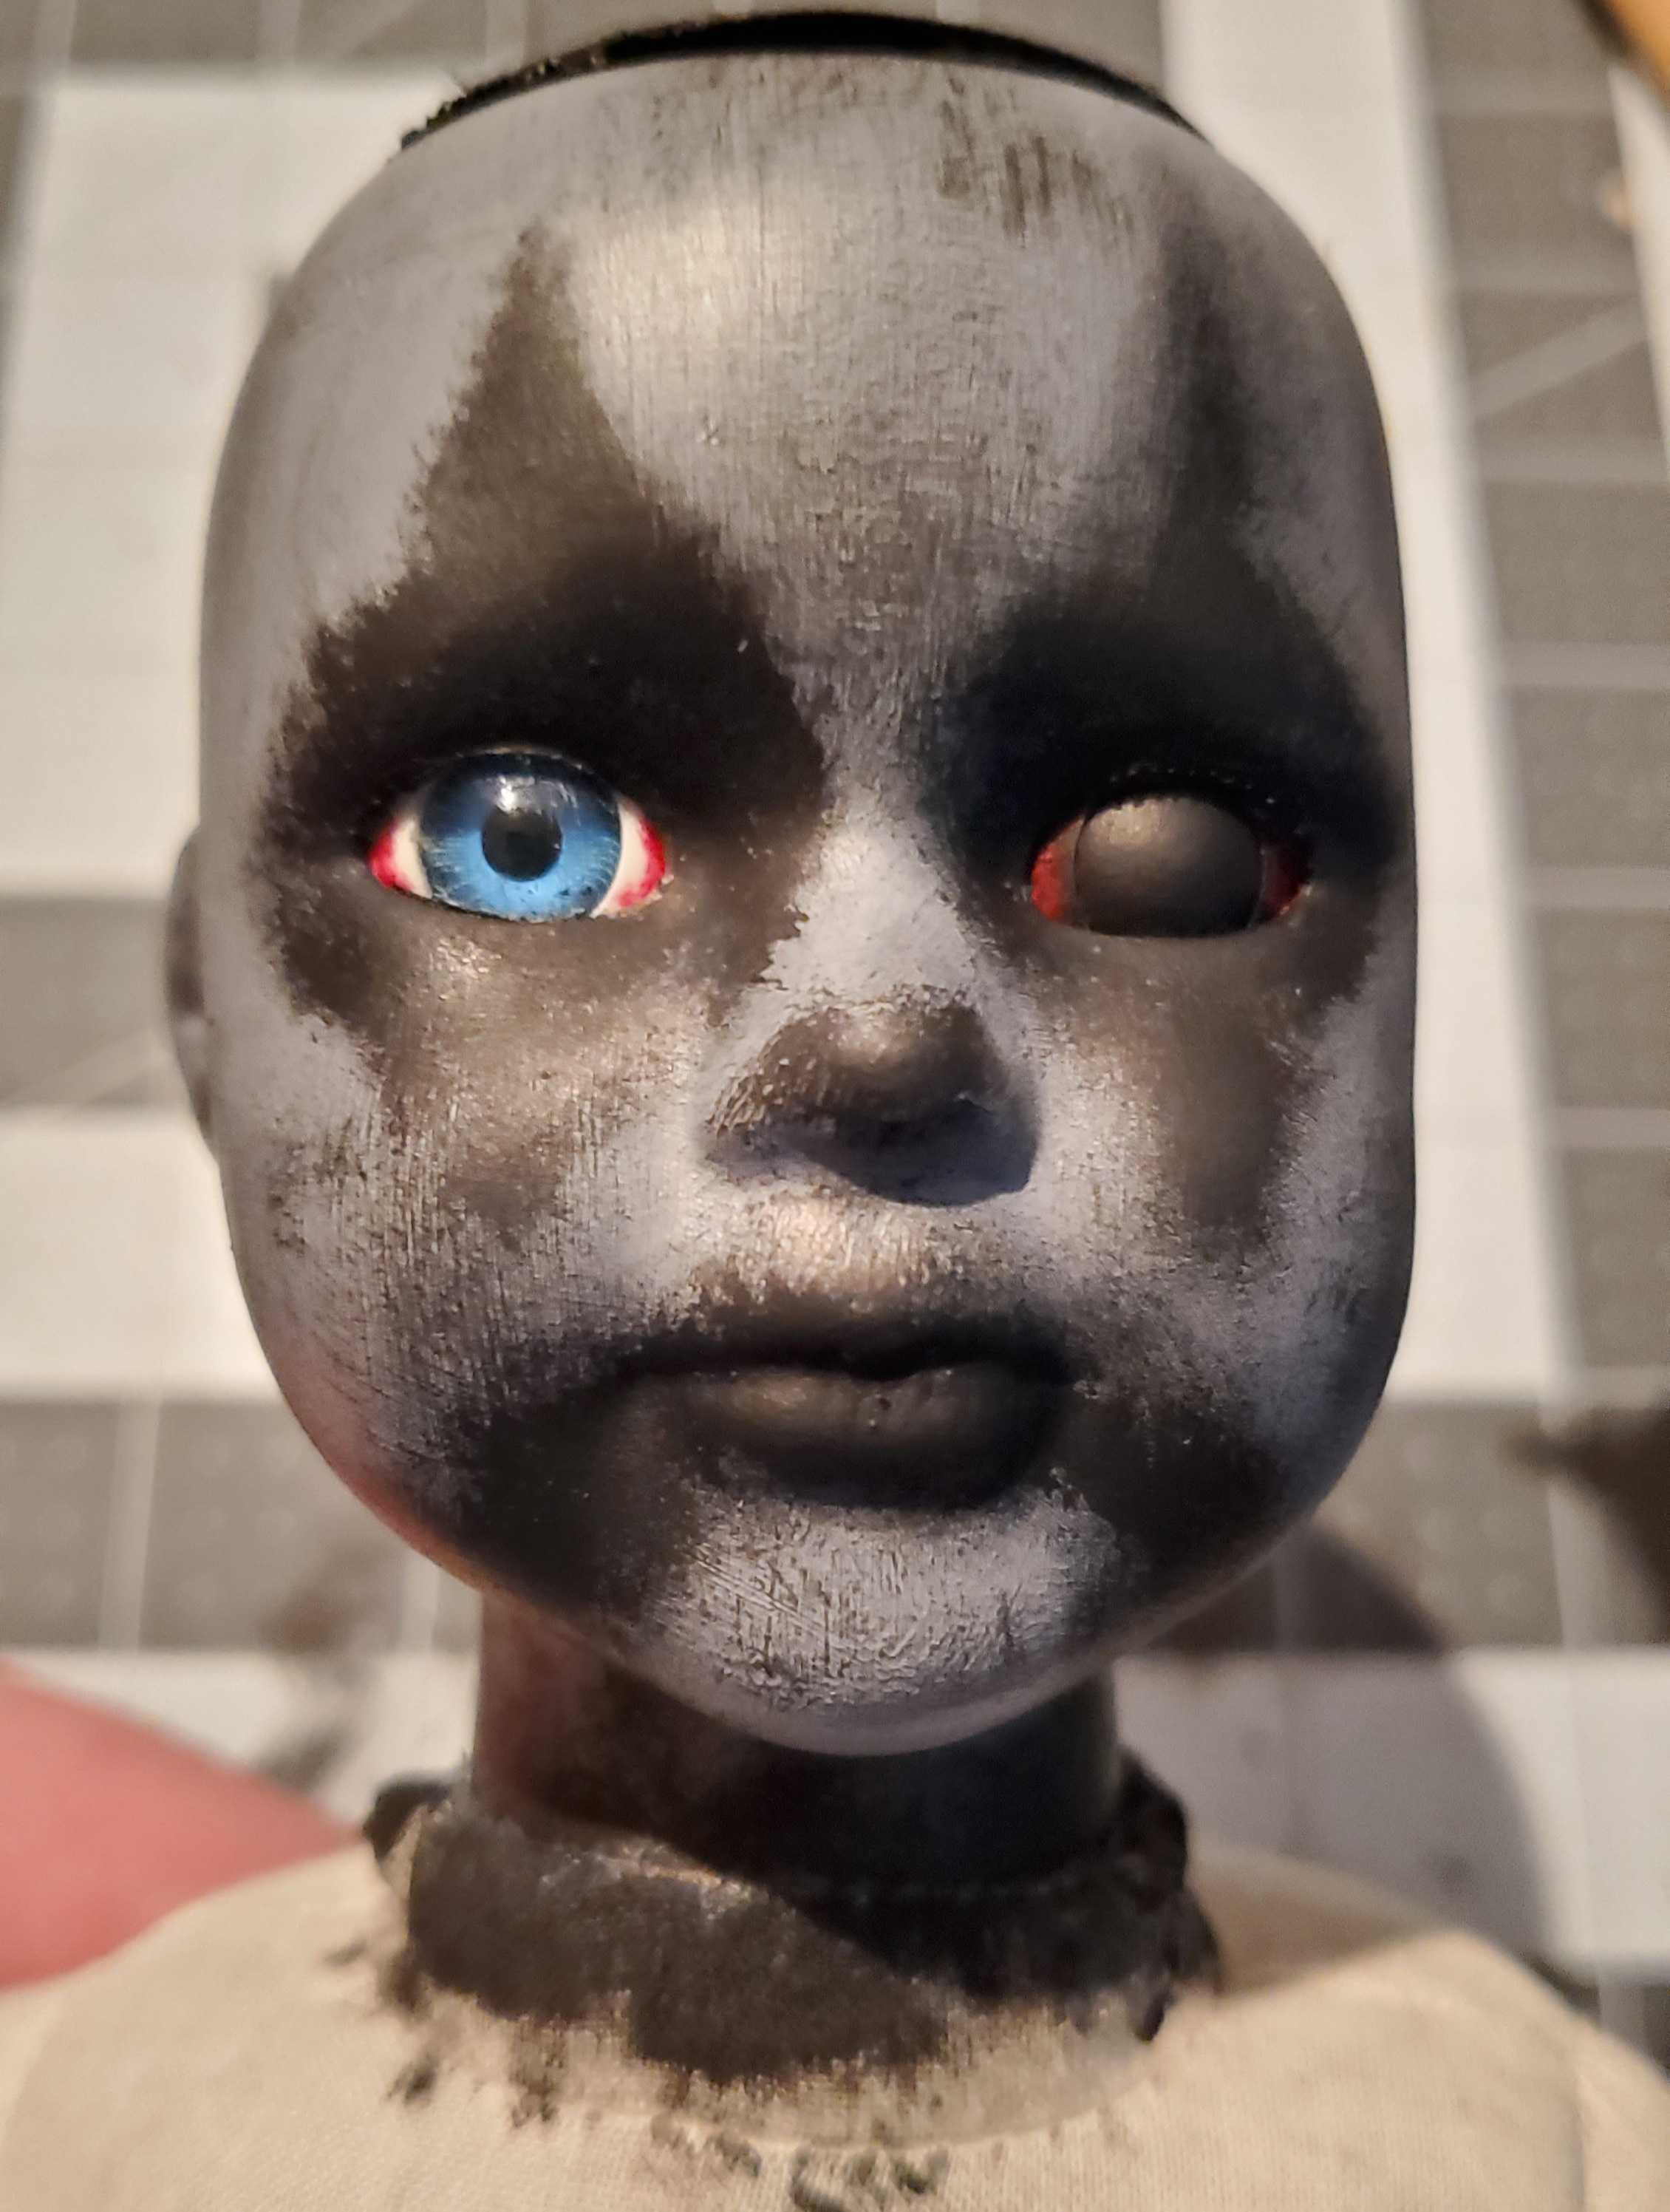
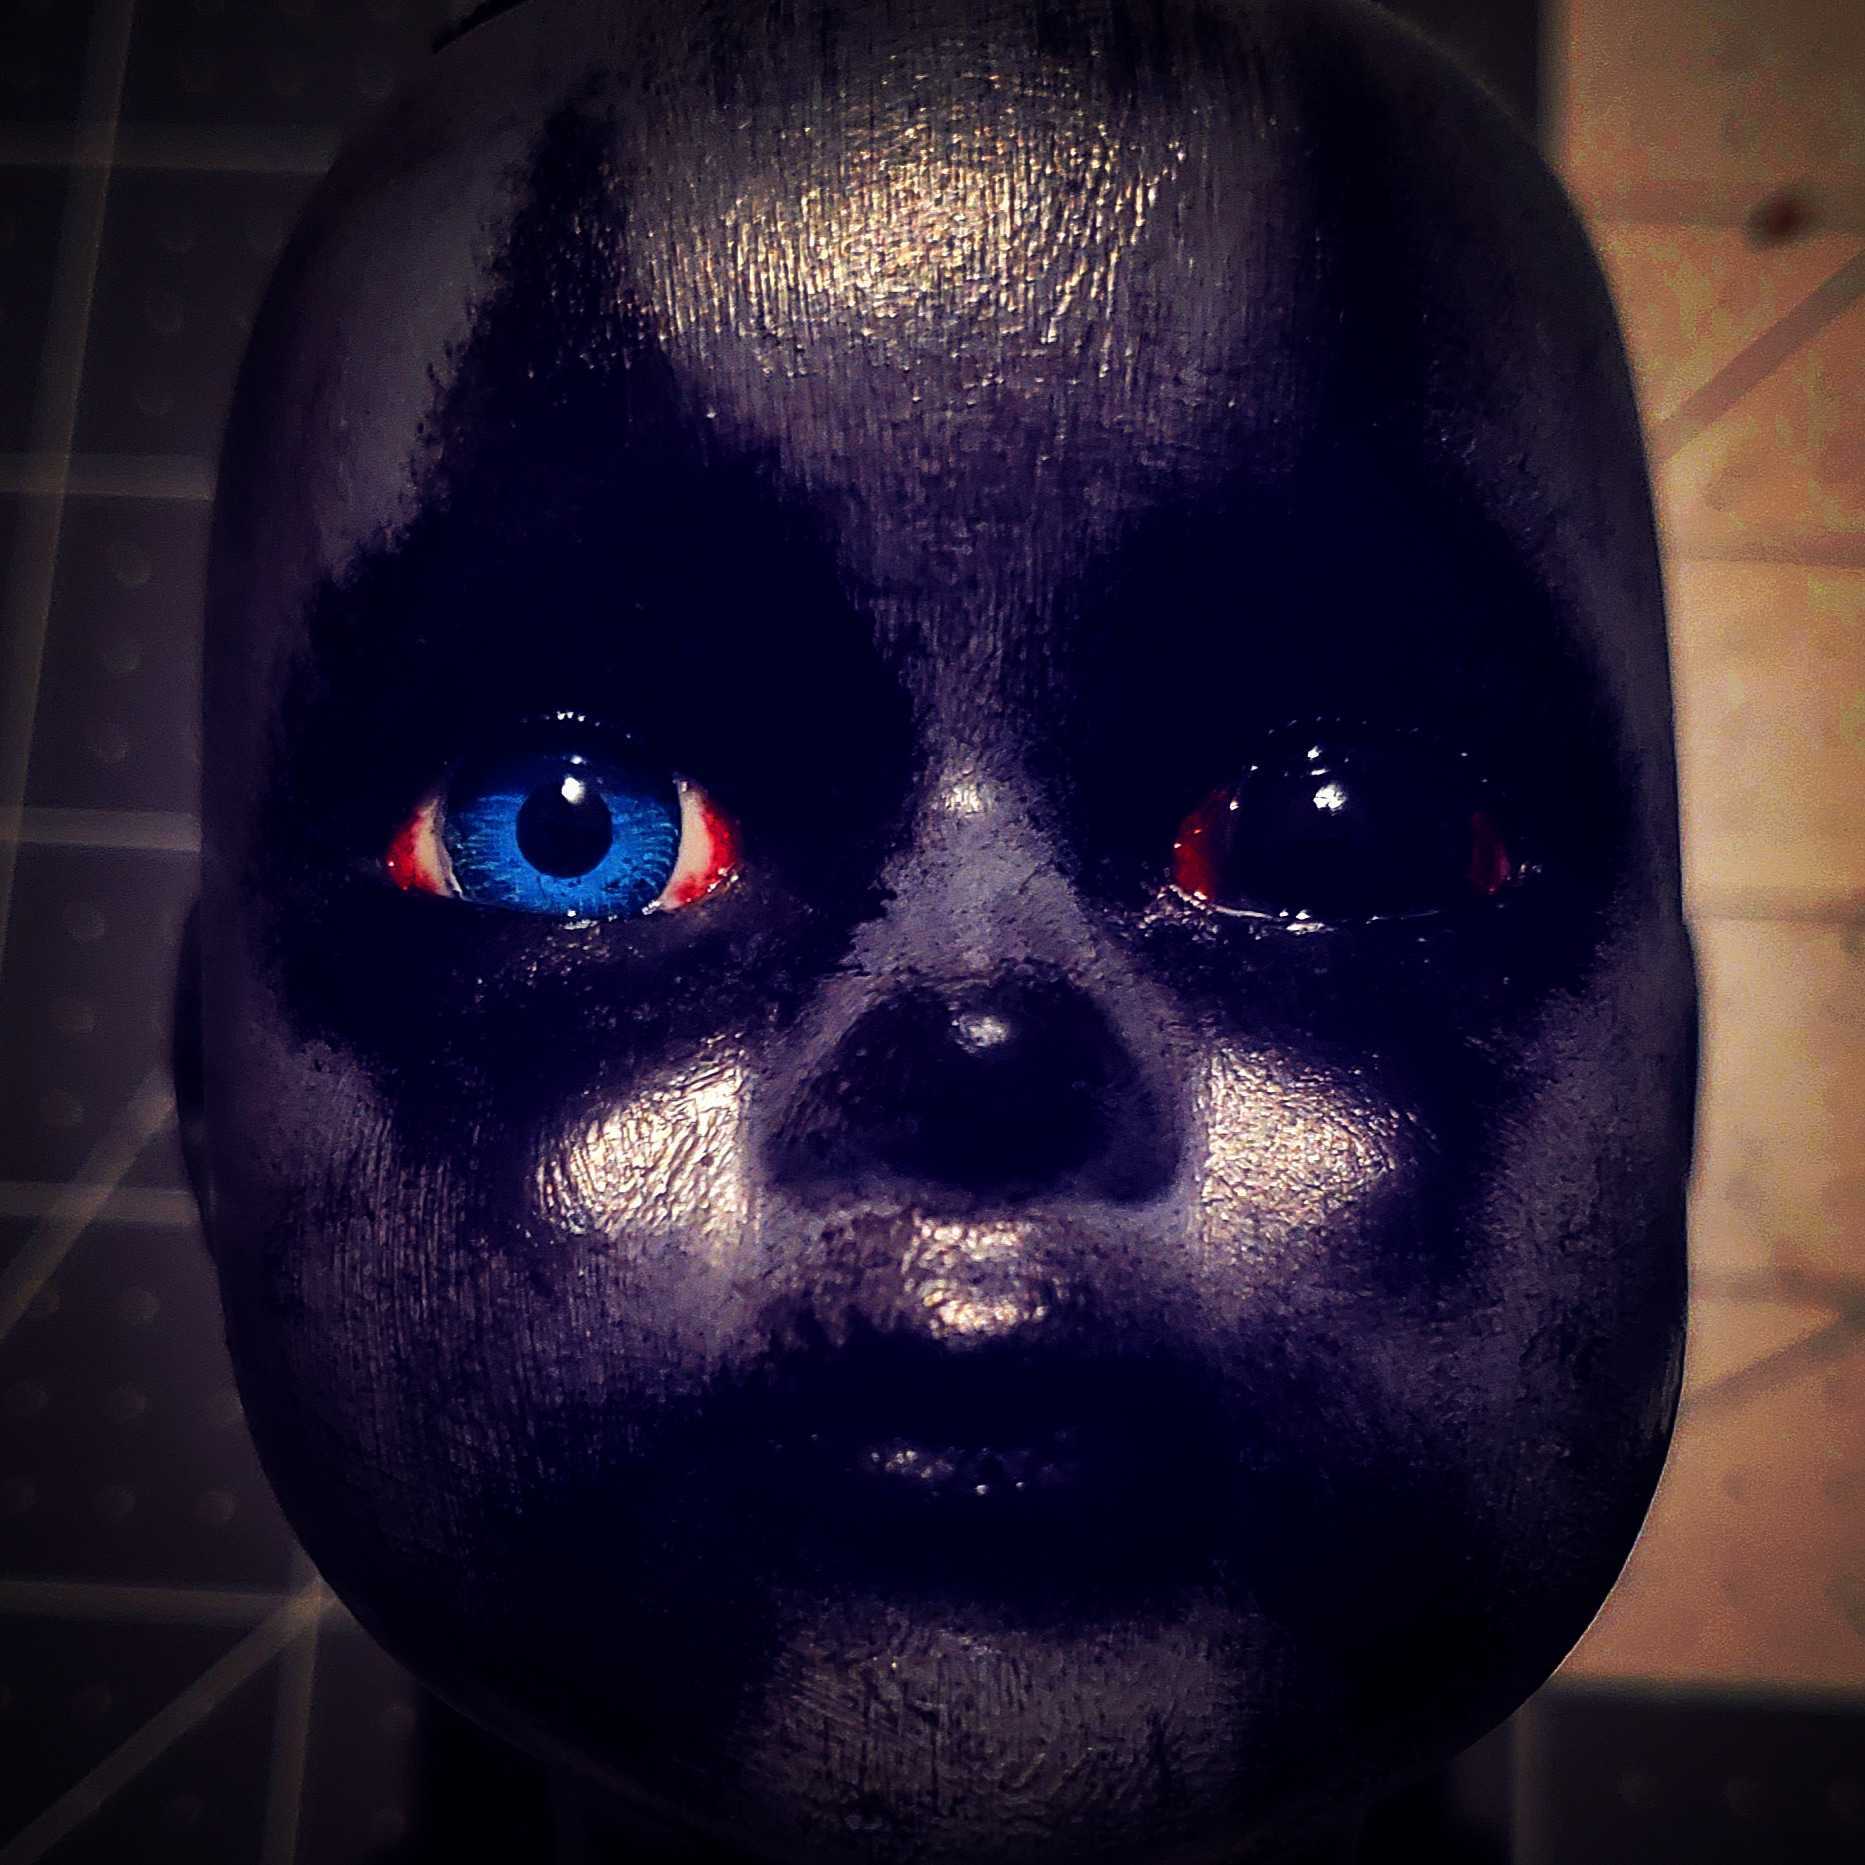
Back to Black… For this doll I wanted a simple Color scheme so I did the make up in black acrylic paint… Best way to achieve the blurry / worn makeup look is to take the soft straight edge paint brush and lightly dip it in the black. Then used your scrap cardboard, paper towel or a scrap piece of paper to get most of the paint off it. Then using a light dabbing motion paint on the make up around the eyes and the mouth (don’t jam it on… just lightly dab it). This will give you the blurry/worn look by blending it all together. Once you are happy with the eyes and mouth time to dry brush on more black all over the head. You will use the same technique… but try to get more off the paint of the brush and then gently but quickly swipe back and forth on the doll barely making contact… this will give it a dirty/aged look by only highlighting the raised areas. The more contact the brush makes the darker and more pronounced the streaks will be.
Then get around the neck line with a heavier coat of black but use the dab method just don’t wipe the paint off first.
For more tips and tricks for the Dry-brush Method… just look up dry-brushing on youtube
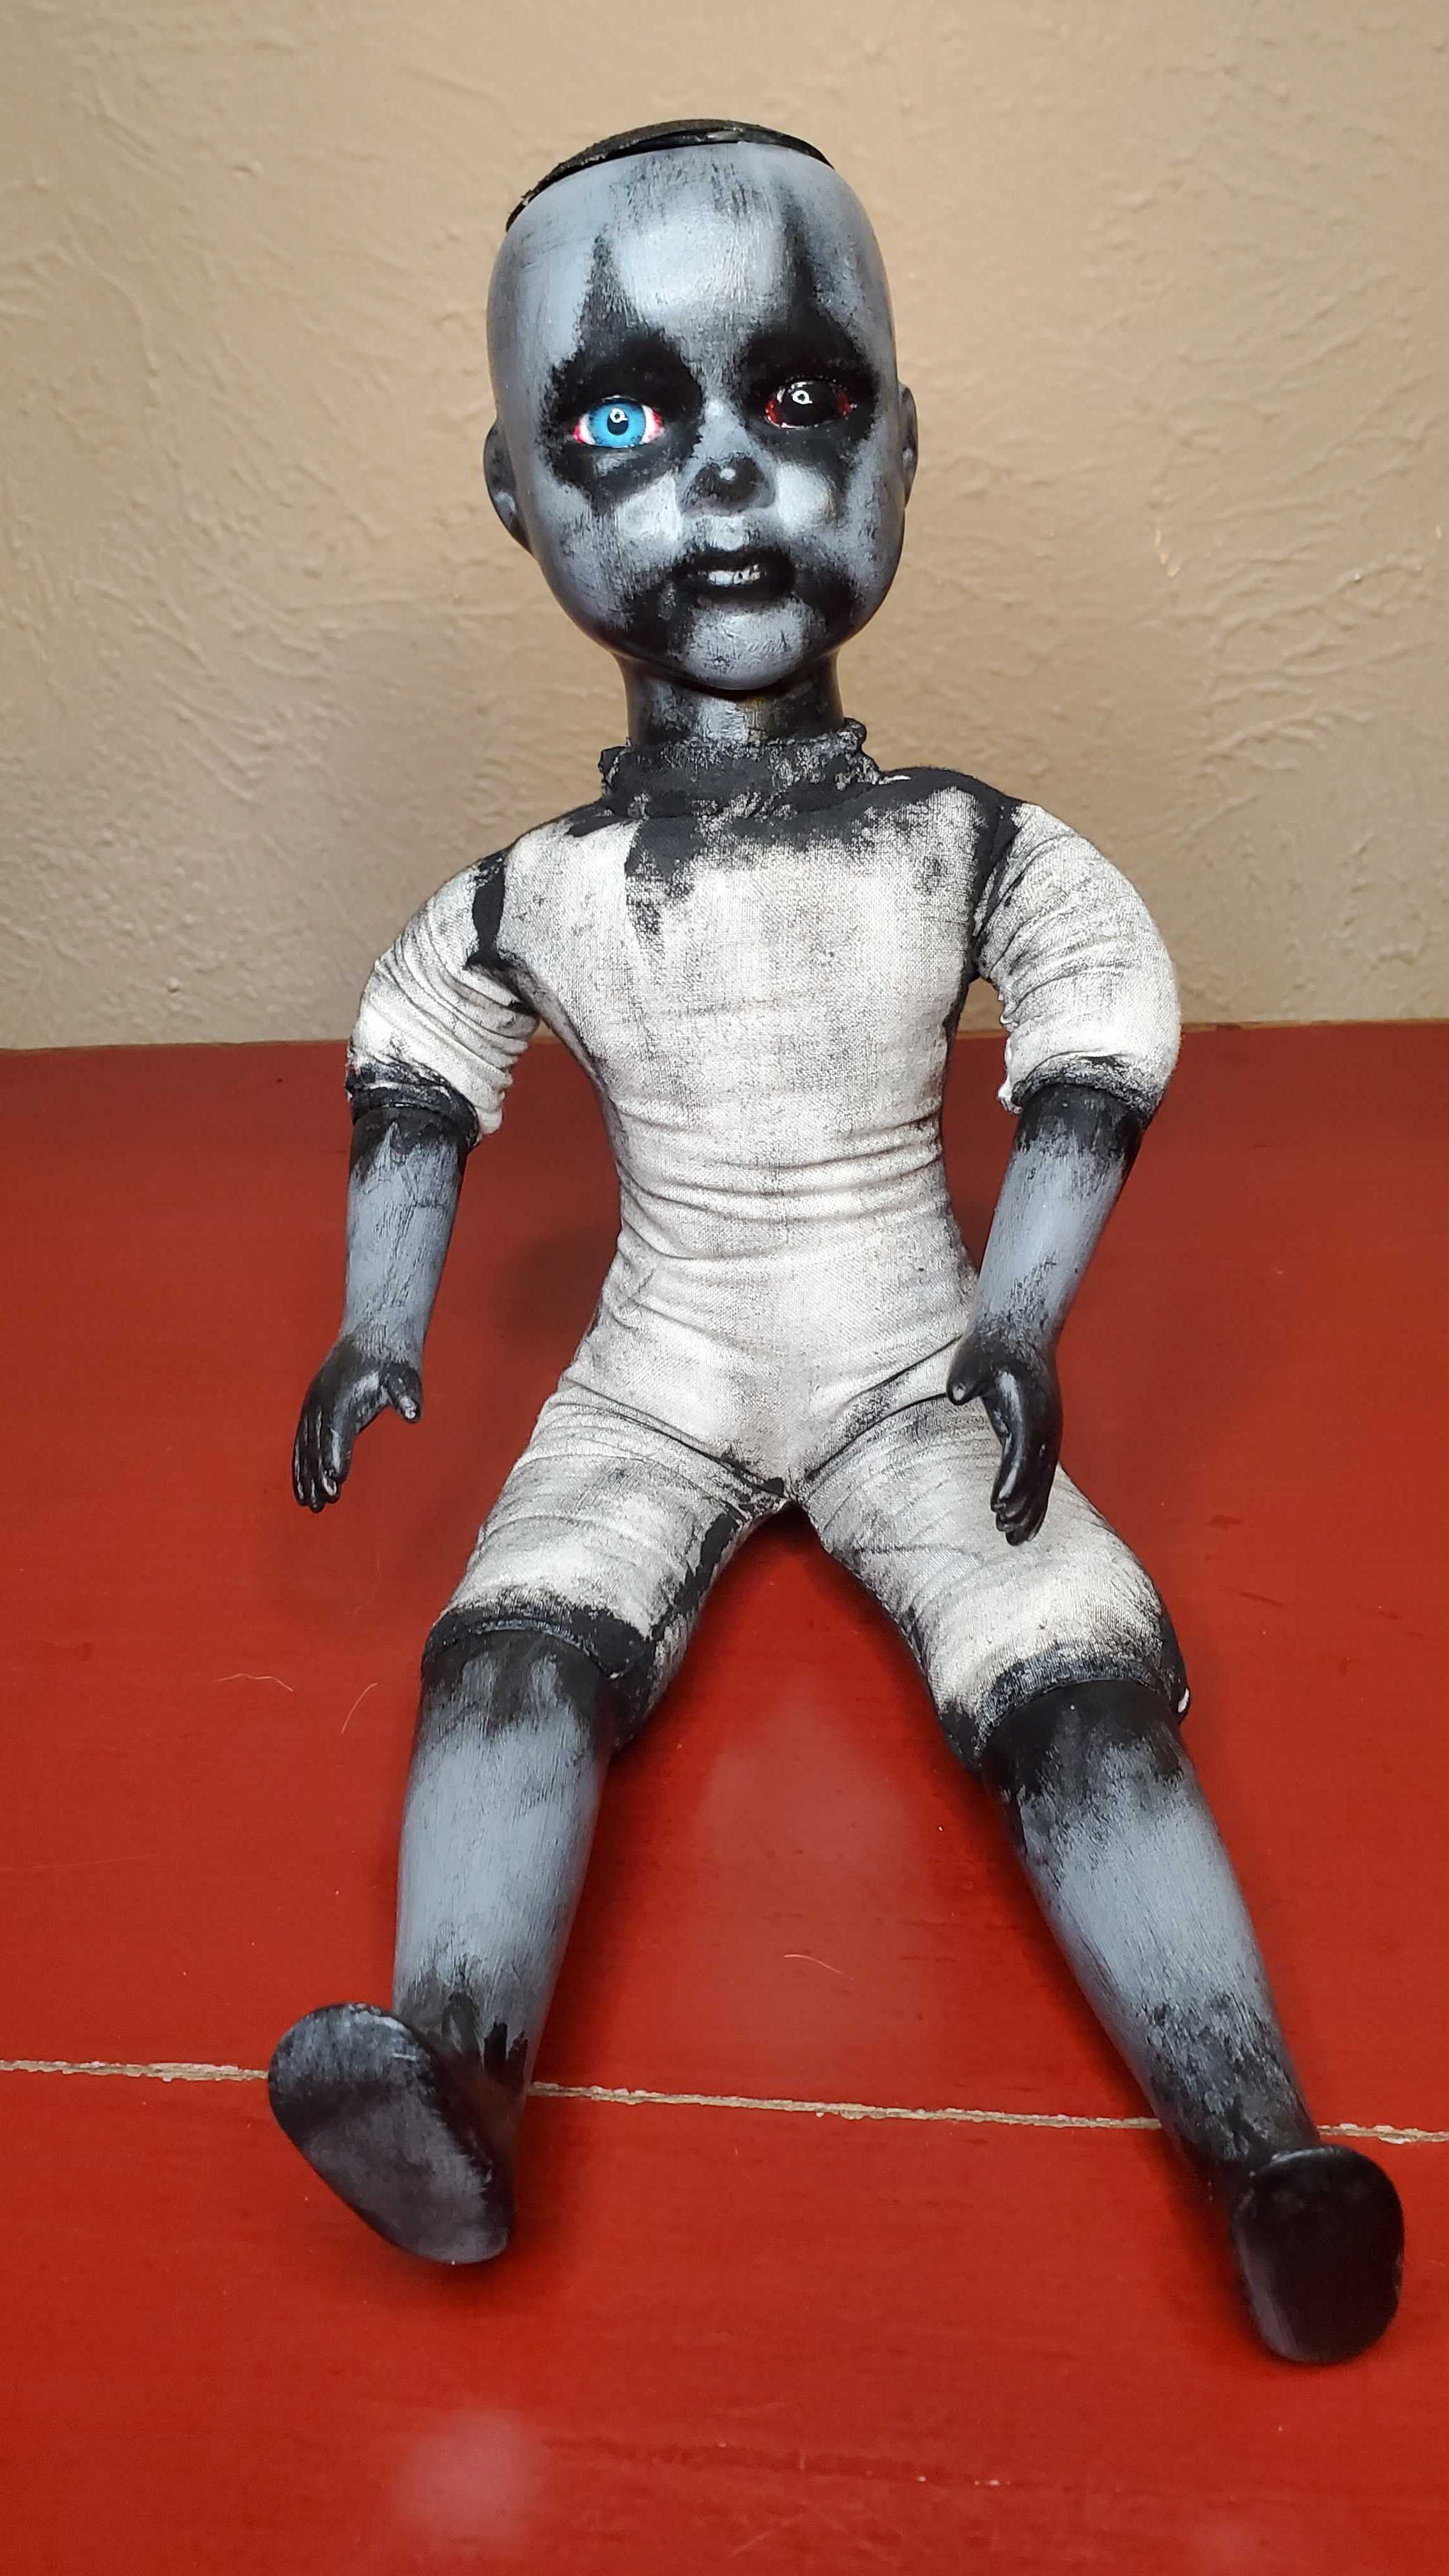
Step Six:
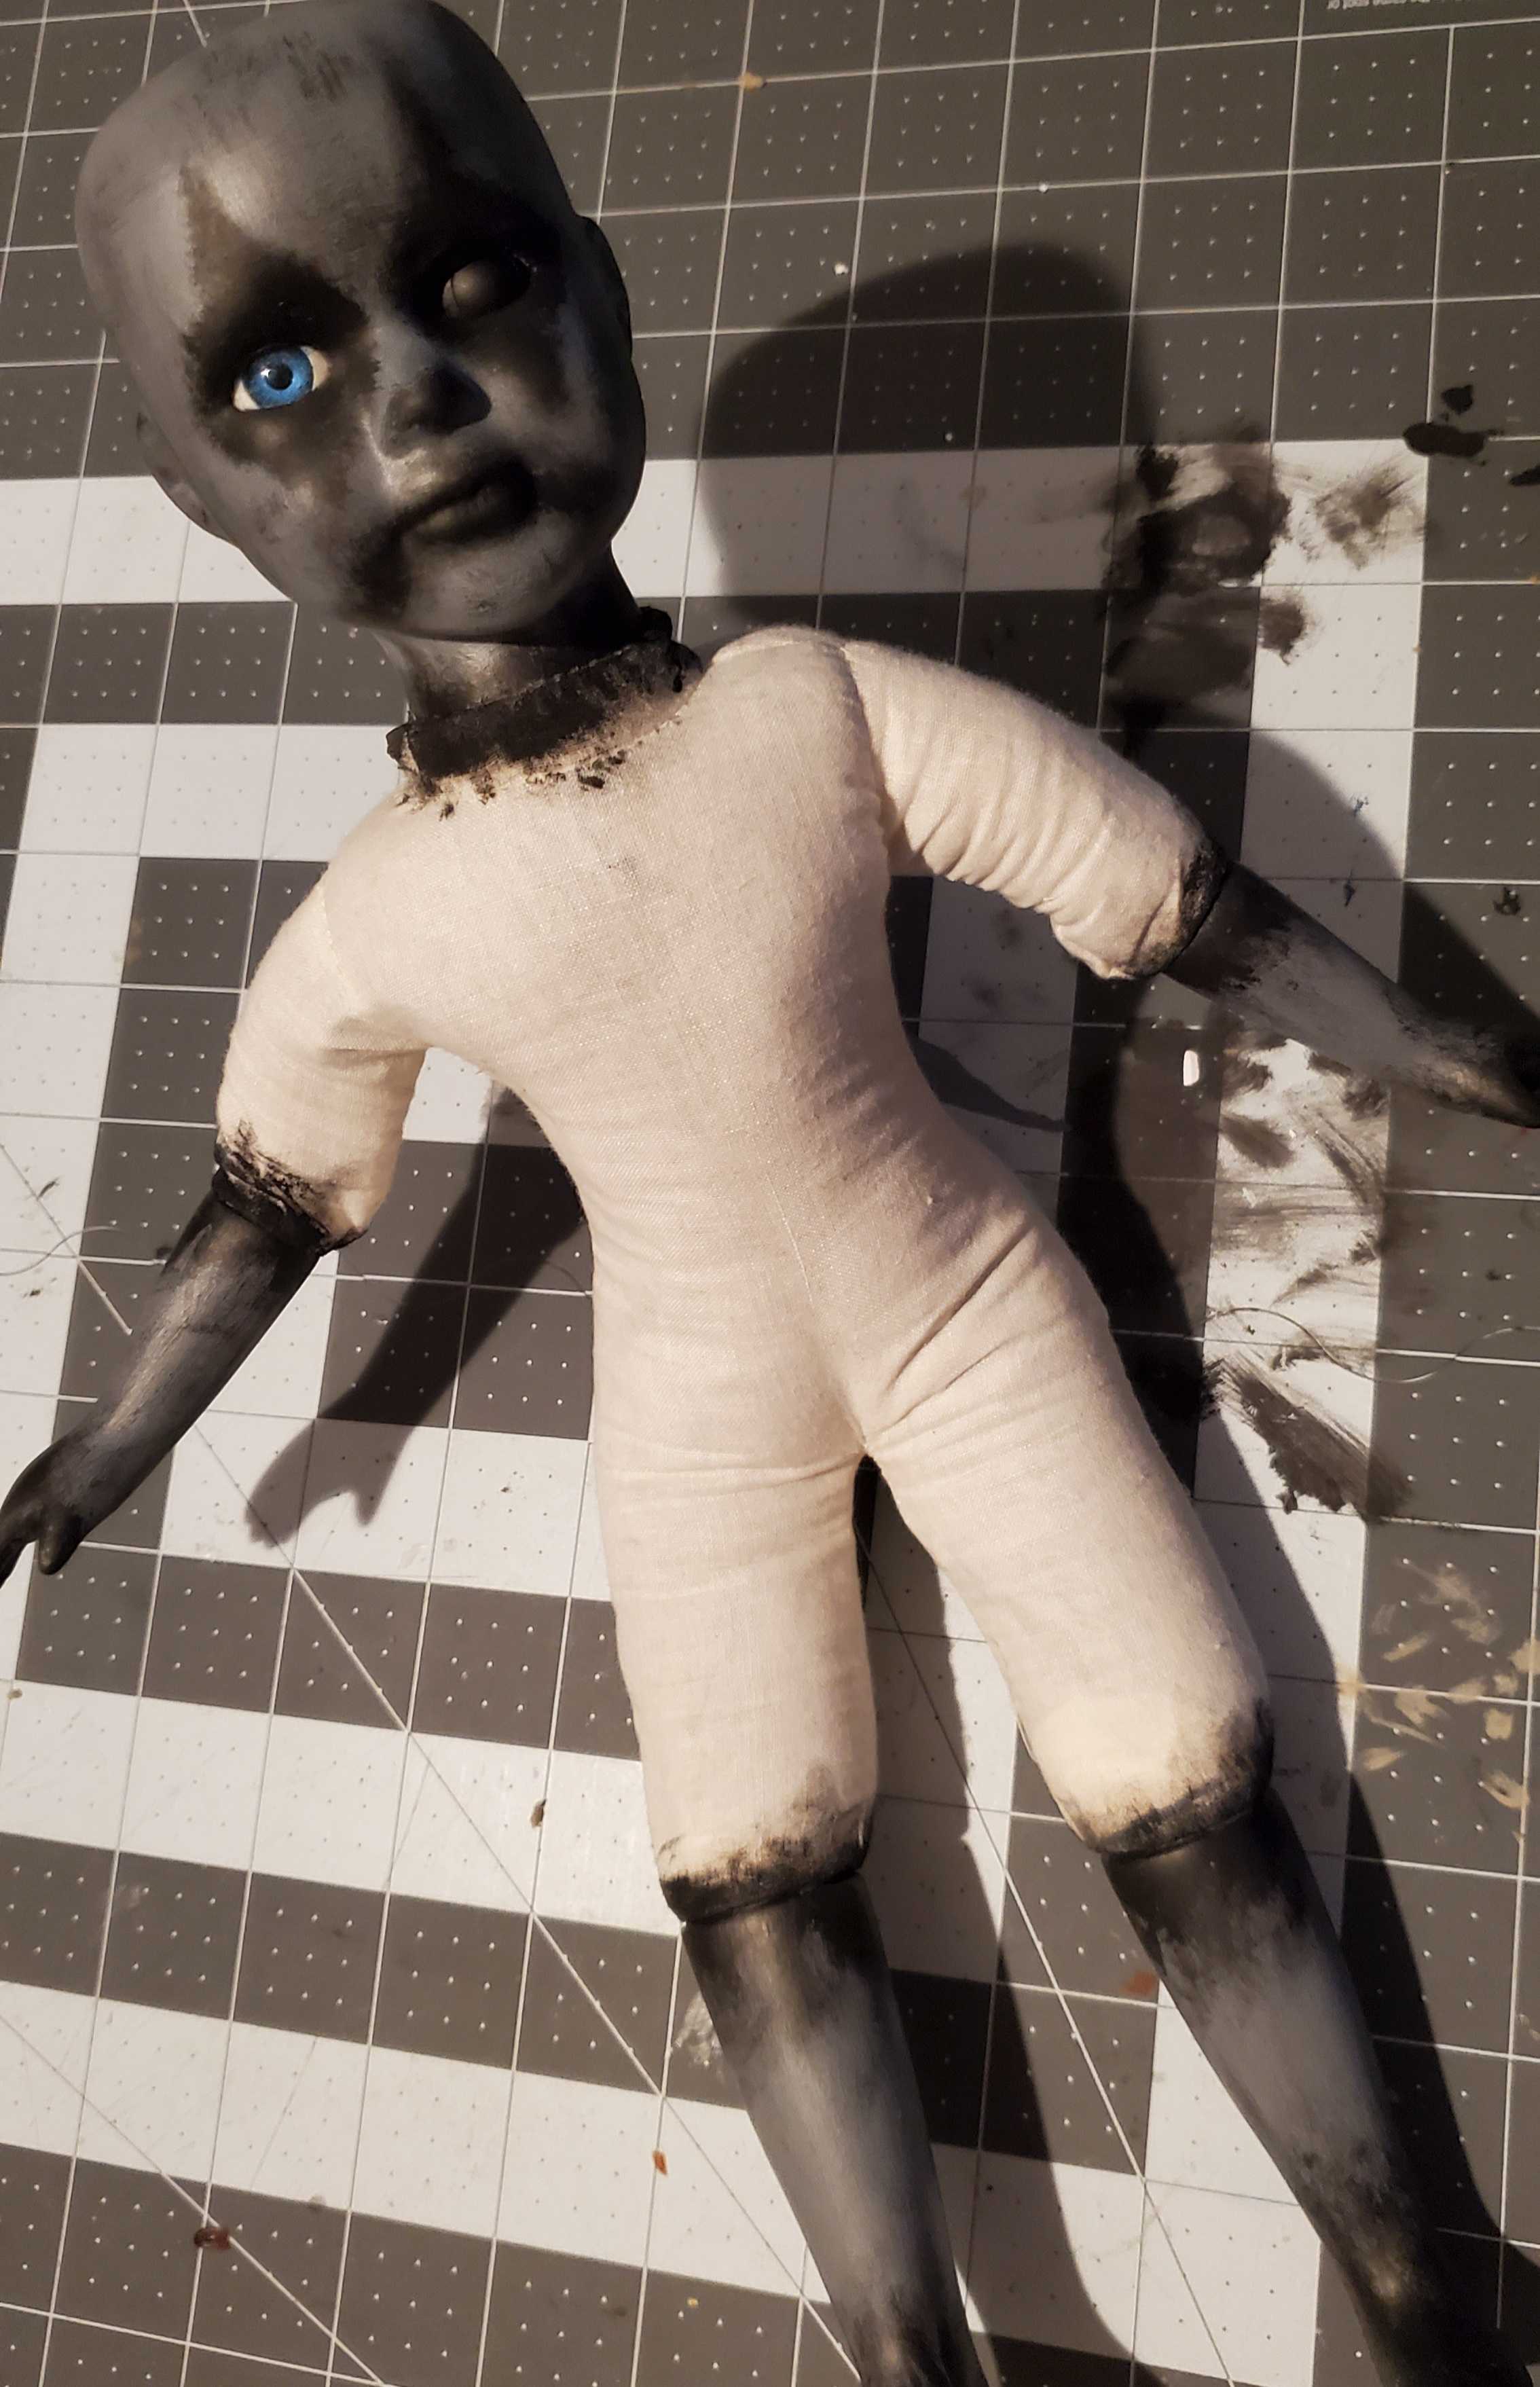
Paint and dry-brush the arms in legs with the black paint in a similar way you did the head.
Step Seven:
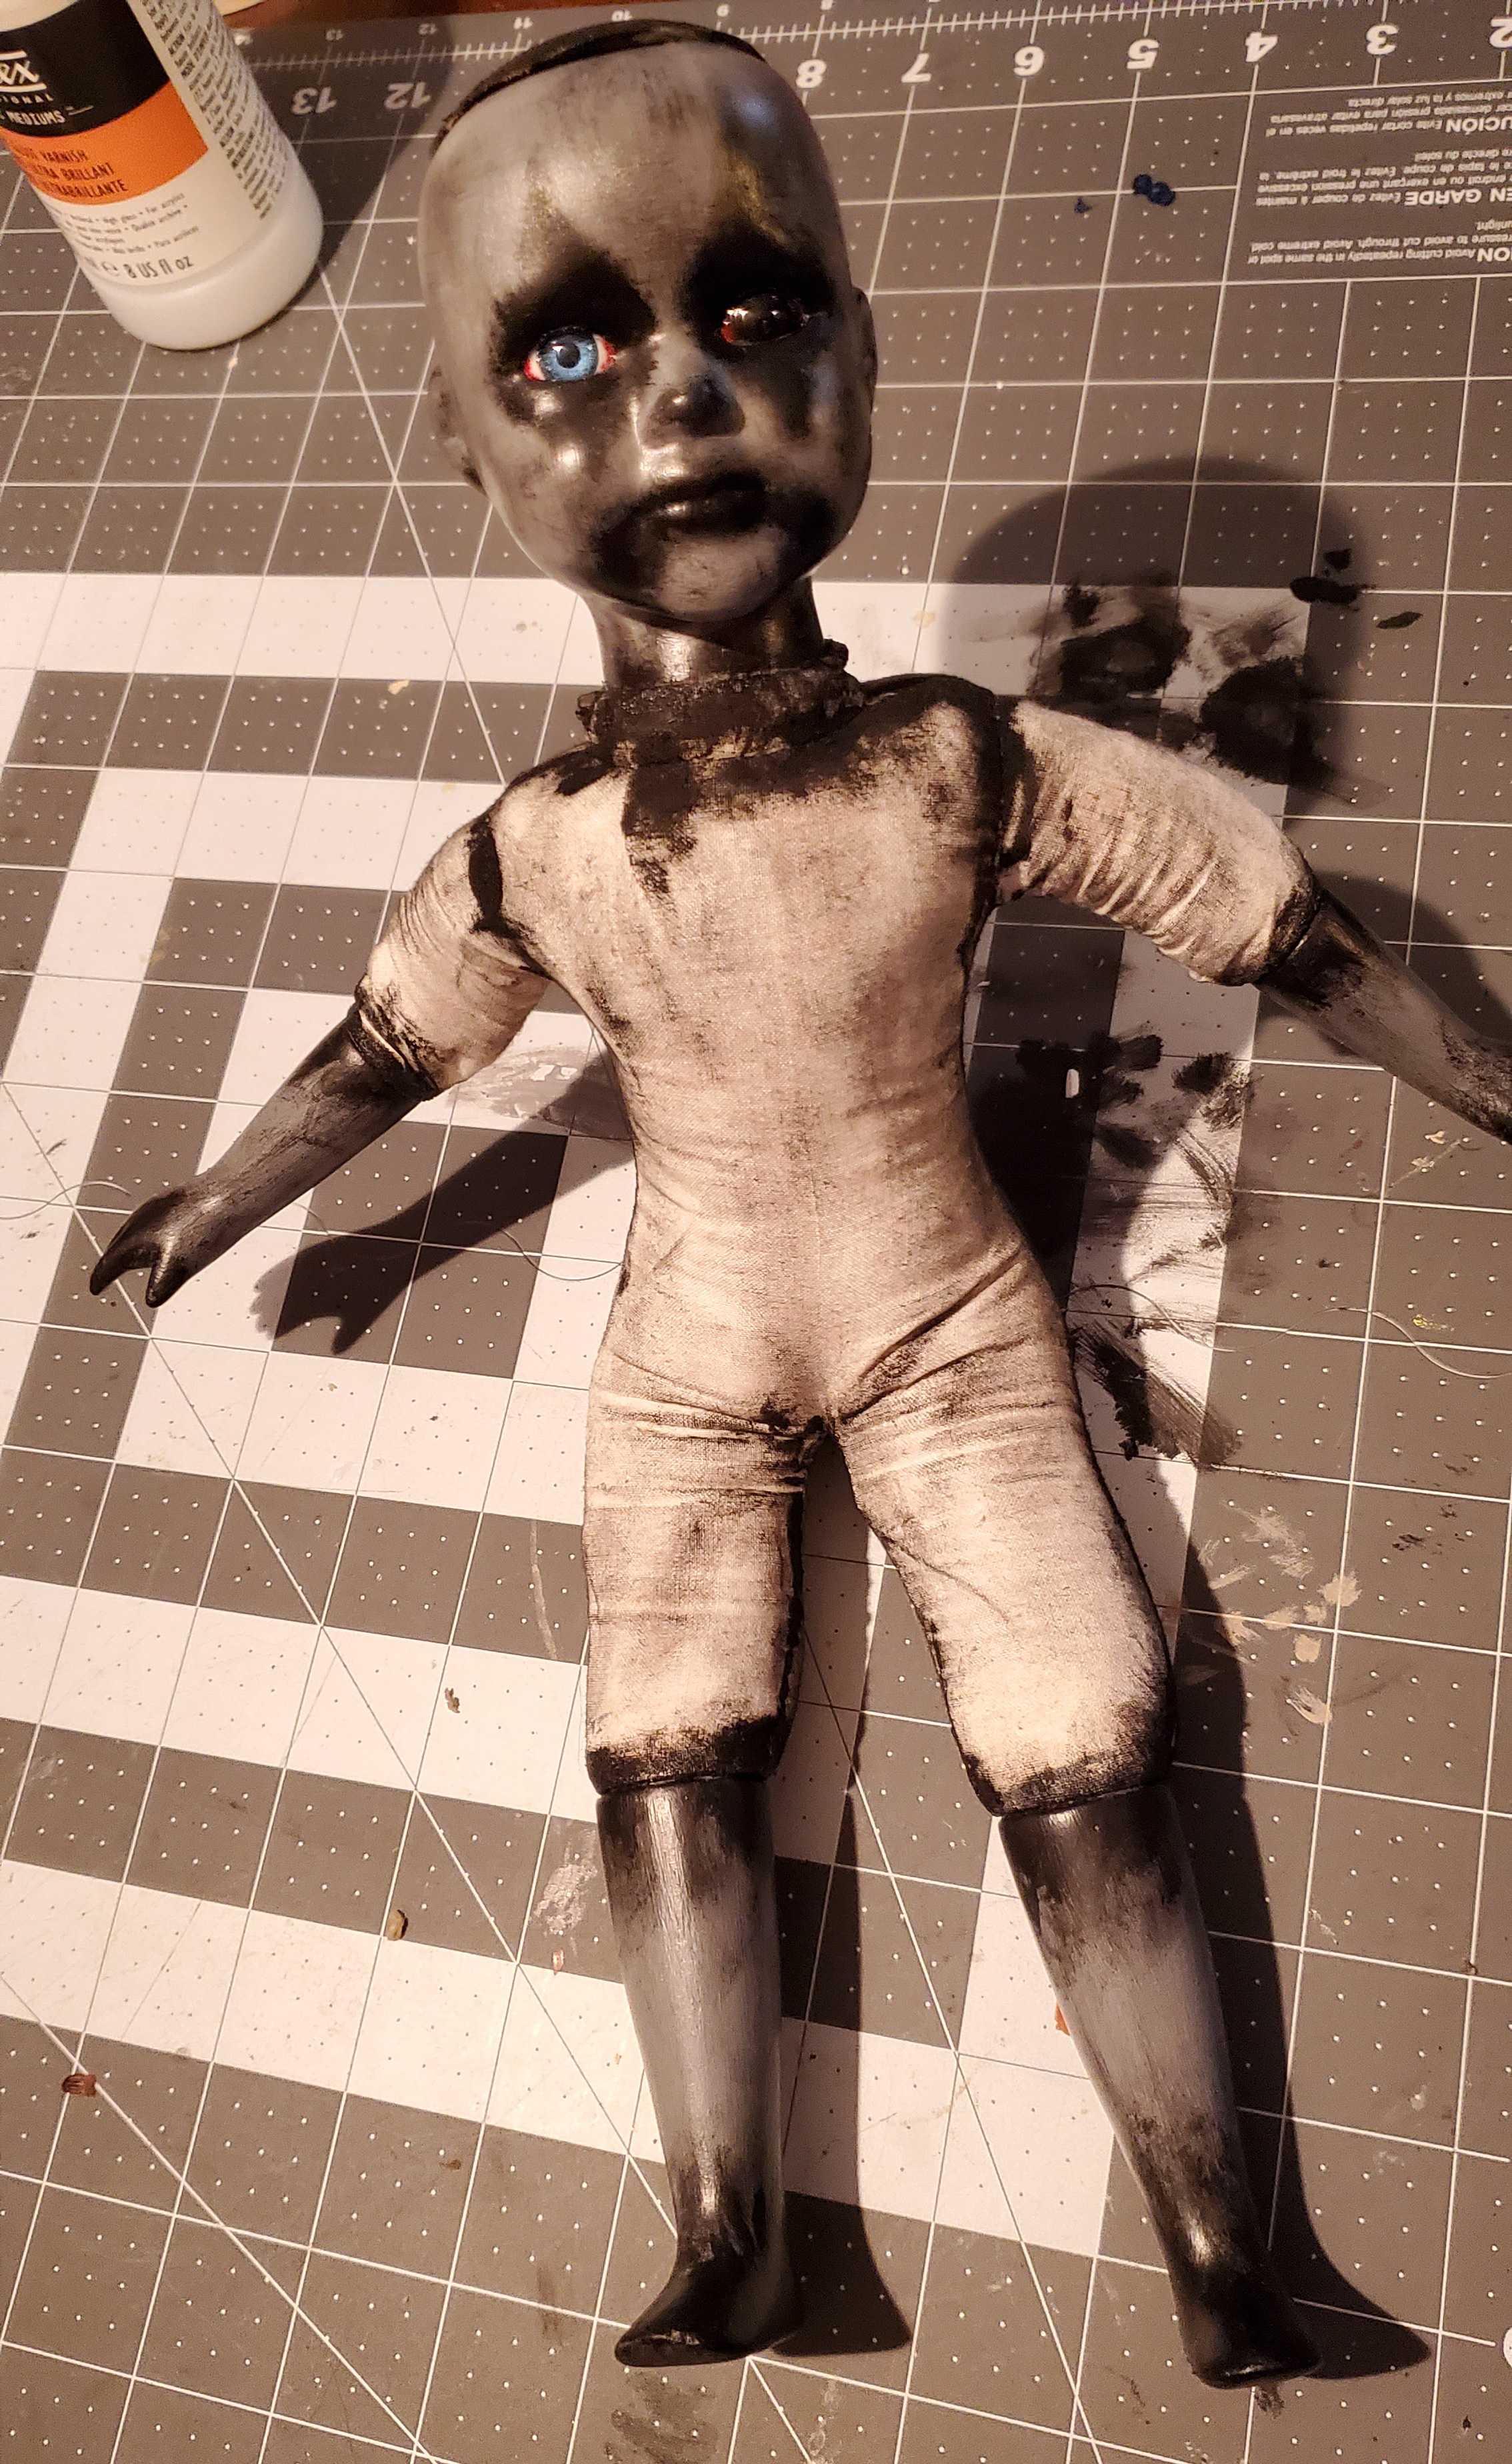
Add a couple of coats of Mod Podge Matte to the painted porcelain areas to seal everything… This is very important… Acrylics tend to rub off if they are not sealed well… so add 2 or more coats to get a good seal.
Step Eight:
Giving the eyes a wet look… before you do this you can add a little red to the corners of the eyes… but you don’t have to. If you do let the red dry completely before adding the gloss. I use Liquitex High Gloss Varnish medium but it can be pricey and harder to find. So you can also use Mod Podge ultra gloss if you want… It is cheaper and you can find it at Walmart and most craft stores… Just remember whichever you use the key is the more coats you do equals the glossier the finish… Sp paint over the eyes using the small detailing brush… In the picture below I did 4 coats of the varnish. I used a Hair Dryer in between coats to cut my drying time.
Step Nine:
Dirty up the body using the black paint… Act like a toddler is painting it… don’t be afraid of making it messy.

Step Ten:
Step back and admire your new Horror doll… you can place it on a shelf, Hide it in your kids bedroom, randomly place it in different places around your house… or give it to an ex and tell them it’s possessed. The sky’s the limit. But do take a picture if you make one and be sure to share it with the class.
For those who want to know…
You may ask “how did you discover this hobby?”… well the TLDR of is this… As far back as I can remember I have had an odd fascination with all things creepy. For most of my life it was just a fascination… but, a couple of years back I had a health crisis that put me in the hospital in a medically induced coma and a tracheostomy. After I recovered, got the trach out and started to get my life back to “normal” I found myself in a weird place. I was not sleeping well, I was having vivid bad dreams, I felt overwhelmed all the time and I could not seem to get back to the old normal. Then someone suggested I find a hobby that could help provide an outlet. So I tried writing… did not really help. I tried video games (which I loved before)… but could no longer get into them and would put them down after just a few minutes. I tried several different things… nothing really helped or appealed to me. Then I came across a random tutorial on youtube from Monster Tutorials on how to “corpse” a plastic skull (Click HERE for a link to that video)… and the guy on the video made it seem so easy… so I tried it… and I got lost in it. It was right then I realized I had found my outlet. So that progressed into creating other props and eventually found a small subset of the “Creepy Crafting” community that took old dolls and transformed them into Horror Dolls. I gave it a try and I was hooked.
- 28 comments, 114 replies
- Comment
Thanks to @brainmist @RiotDemon @sammydog01 @ybmuG for the idea of doing this… If ya’ll want me to do more I can… Had fun doing it over the weekend.
@Koolhandjoe This was fantastic and i love how you turned a couple of goofy posts into a seriously great tutorial. I can definitely see the importance of how you treat the eyes. The one blue one i think makes the doll. You make it look easy and I’m sure it is to you, but that’s the difference when you have actual talent. I know my limitations.
My favorite quote:
Now we’re talking my level of expertise!
@ybmuG i appreciate the kind words… I had a blast putting this together and will probably do more.
“If ya’ll want me to do more I can”
like i don’t have enough nightmare doll images in my head already.
@carl669 There’s such a thing as “enough”?
@Koolhandjoe, this is phenomenal! Thanks so much for all the work!
I don’t know if you’ve ever done Instructables (briefly got addicted, never did upload my “How to turn an old umbrella into an articulated 4’ spider puppet”) but this is a very thorough explainer.
I know the appeal of the macabre… I got into haunt work about 35 years ago and never looked back. I credit Alice Cooper, who opened my eyes to a very different sort of normal when I saw him on the Muppet Show…
@brainmist I use to use Instructables but never have done any tutorials myself… I might have to agree with the Alice Cooper Muppet appearance… I was but a wee lad when I saw that… could explain everything… haha
@Koolhandjoe I distinctly remember him jumping around in a devil suit singing about how school’s been blown to pieces and thinking “Now there’s a lifestyle I hadn’t considered”.
Well, OK, perhaps not exactly that. But the 6 year old equivalent.
@brainmist
@Koolhandjoe I got to see him live about 2 years ago, and he is still incredible.
@brainmist @Koolhandjoe I saw him live 45 years ago on the Welcome To My Nightmare tour. Suzi Quatro opened for him and she had some bright photo strobes flashing and the acid really kicked in and Alice Cooper came on and the journey began. After, I took a wrong entrance onto the freeway and had to drive miles in the wrong direction to the next exit and then just drove generally west on dark surface streets through unknown suburbs and business districts to get back to familiar territory to find my way home. Wild night. Still seems surreal all these years later.
@brainmist @Koolhandjoe @macromeh
I too love AC’s work. OTOH I am totally in awe of his ‘real life’ away from the AC persona. For instance, turns out he is a golfing fanatic!! How cool would him showing up at the PTA meeting would that be!
Those instructions are amazing! I picked up a doll with a plastic head at the thrift store and may mess around with it. The lady at the checkout said, oh that’s the kind of doll I had as a child. IT WON’T BE FOR LONG, SISTER! The porcelain ones from Goodwill haven’t shipped yet. I’M SO EXCITED!
@sammydog01 Thanks… I have done a couple of the plastic ones… You can take cheap 1-ply toilet paper and Mod Podge and make some cool corpsey textures.

@Koolhandjoe @sammydog01 I’ve also seen people use this, or Elmer’s glue and TP, to simulate peeling skin on themselves.
Pro tips:
-Do not use patterned
-Do not use during a TP shortage.
@brainmist @sammydog01 switched to cotton balls and liquid latex during the height of the lock down… wife took all my rolls i had for crafting and added them to our personal stock… come to think of it… i never did get them back
@Koolhandjoe @sammydog01
That one reminds me of regan from the Exorcist
Well heck, I think I need a Goodwill run tonight…my kids won’t be sleeping well now if I can do half as well as you (insert evil cackle)!
@cbilyak Better than Elf on a Shelf… Dolls in the Walls… Kid acts up… new random creepy doll appears somewhere around the house… just watching… and waiting…muahahahaha
Not into creepy myself, but LOVE the creativity!
Amazing work. I wonder if my daughter would volunteer a doll or two (she might).
Monster Tutorials is another guy I’ve been watching for years. He’s awesome.
I think the dolls in my trunk are talking to me.
KRULL! A SKULL! BRETT HULL! AWESOME!
@RiotDemon If they are are talking… you better listen
@Koolhandjoe the funny thing is, I actually bought them for something else before everyone started talking about this. Guess it was fate.
@RiotDemon
@Koolhandjoe
@RiotDemon Limitless potential!!!
@RiotDemon if you need a little inspiration… here are a few ideas for you
@Koolhandjoe @RiotDemon Do you have to put them away when small children come over?
@Koolhandjoe thank you. I’m keeping this for when I get to sit down and really look at them. I just kinda threw them all in my arms and went straight to the register.
My biggest question is, how did you get into selling them versus just keeping them?
@ybmuG i mainly keep them in one room of our house and just close the door when my neices come over… a few others stay in my office at work and if i have them up for sale i sometimes prebox them
@RiotDemon i had a lot of friends and family suggest i try selling some of them… so i opened my Etsy store… but i don’t put up very many. I rarely advertise but have done ok… it is more just a hobby… i actually get more satisfaction just giving the stuff away like in IRKS and watching the reactions than i do selling… but selling has provided me enough money to get better tools… but really the biggest push to sell is when i saw how much people pay for horror dolls.
@Koolhandjoe very cool. I appreciate it. I had mentioned that I was buying them for something different but maybe I’ll end up enjoying this more than my original purpose. I’ve never used etsy except for a couple of purchases so I suppose I don’t know that much about it.
I’ve been looking for something I can do on the side to have a little extra fun money, so I’m branching out.
@Koolhandjoe @RiotDemon So my big question is, what were you going to use that whole box of porcelain dolls for? I’m jealous.
The ones I got from Goodwill just got here.

The two on the right have porcelain bodies too. I need to go to the craft store soon. I’M EXCITED!
@sammydog01 Porcelain bodies???.. I am jealous… have not come across any of those in the wild… saw one person use those and broke them apart and put sticks through them… made it look like the plant grew through it and broke it… then made that into a lamp… if I can find that picture I will post it… but it was cool… but I totally see an opportunity to do a creepy take on Hansel and Gretel with those 2 in lederhosen… like have one eating candy out of the head of the other
@Koolhandjoe @sammydog01 the little European boy and girl need to stay as a pair!
I actually bought them for a Halloween project… It involves servos and micro controllers. I don’t really want to say much more than that in case it fails spectacularly.
@RiotDemon @sammydog01 I have been wanting to to try out animatronics and tinker with small movement controls… but that is a skill I have not been able to wrap my head around… can’t wait to see what you do with it though… sounds fun
@Koolhandjoe @RiotDemon If you are going to turn them into naked dolls you can probably sell the doll clothes they are wearing which might then support a small part of their transformation.
I love my Klown, @Koolhandjoe!
How many of these unique creations went out? I’m honored to have received one.
@PocketBrain Thanks, so far i have sent out 4 dolls… also corpsed the 2 skeletons from the last couple and i also made the tiny hand earrings and tiny baby earrings in the November Irks… and i plan to make more of those… i hope to send at least one or two creations in every IRK moving forward… as long as i can get away with it… some may be big some may be small
Love your work please continue sharing.
Do you sign the pieces? You should.
@speediedelivery recently started… never thought to before
@Koolhandjoe @speediedelivery Definitely sign them! With your Meh handle for the IRK ones.
I have a bunch of skeleton garland (cheap post Halloween sales)…I should doll them up.
@brainmist @Koolhandjoe @speediedelivery
Looks like you took the advice of your fans.
…From my IRK that arrived yesterday.
@Koolhandjoe
BTW, thanks for sending this out in my IRK.
@chienfou I did… and hopefully everyone that gets one gets the same enjoyment out of them I get when making them… I love sharing them… on a side note… make sure you share your stuff in the Pre-Valentines IRK Reveal thread… This time I sent out several creations
@Koolhandjoe
Actually, did that first!
See post here
@chienfou cool thanks missed it
You are ready to join Los Espookys!


My wife’s grandmother used to make porcelain dolls. We have an “old lady” doll that was already pretty creepy with the blue veins and all. Then it’s legs got broken. Last known location was in a hat box in the closet, but it’s not there anymore…
@walarney sounds like it escaped!.. Now it sounds more when it finds you vs when you find it scenario
We’re moving, house is almost empty, still have not found the doll. How far could it go with broken legs?
@walarney if it appears at your new house… call a priest
I found this on Reddit today and I love it so much.
/image Campbell’s soup boy

@sammydog01 that is fucking terrifying.
@RiotDemon The new post has the price down to $20 and the words “Please I need him gone.”
@RiotDemon @sammydog01

This is an option…
@RiotDemon @sammydog01 @ybmuG I will admit… that one gives me the chills… yikes
Careful. Trash can didn’t work out too well for Telly.
@walarney Circular saw either.

so i just figured out some of these are being sent in IRKs. just a humble request to whoever decides: if you send me one of these, please send holy water and a flamethrower as well. k thx bye.
@carl669 don’t know about a flamethrower and holy water… might have to make do with some screen cleaners, a hairdryer and a roll of duct-tape… on a scale of. 1 to Macgyver… how handy are you?
@Koolhandjoe just give me the duct tape and i’m good
Went to the craft store. LET THE GAMES BEGIN!

@sammydog01 Have fun… can’t wait to see how it turns out
My doll wasn’t quite what I expected under her clothes.

Which is kind of cool- her head may be easy to attach to non doll items. I’ll think about it.
She has glued on eyelashes- I was trying to get the brown glue off her eyeballs and the eyelashes peeled right off. I’m saving them in a baggie.
She’s painted black now.
@sammydog01 I wonder if you change the thread that holds her head on, where it looks like someone hastily fixed it, if it would look creepier.
@RiotDemon Yeah that might be cool. I’m looking around the house for something completely different to tie her head to. Not a soup can though.
@sammydog01 how you coming along?
@RiotDemon Stuff happened. First world problem stuff, and lots of it. I’ll take another run at her this weekend. I really need to since I have another box of dolls on the way.
@RiotDemon @sammydog01 That face is too sweet. Definitely needs to be attached to a centipede body. Or maybe scorpion; tough call.
You could take some duct tape and run it around it then hit the duct tape with a heat gun (in a well ventilated area with a mask on!!!)… it melts and shrinks the top layer and leaves the fabric weave looking dirty… key is take it slow so it doesn’t crack the porcelain)… Or dye the dress with RIT synthetic dye… or just attach the bust to a wooden stand or under a cloche… or… take a Dremel tool with a diamond cutting wheel and slowly remove the head from the bust at the neck line… and keep the chest portion attached and place the head in its lap… similar to the one below… I just have a another doll holding the head but same concept… Just some thoughts…
@Koolhandjoe I like that! She came with a stand and everything.
@sammydog01 I have removed faces from porcelain dolls using these…
Rotary Tool… like $10 from Harbor Freight
and this bit… around $8 bucks from Harbor Freight
If you use a the rotary tool above it takes a while and you have to go slow… take time to brush cool water over where you are cutting so you don’t crack the porcelain… you can then smooth out the edges by sanding down the sharp points with a sanding bit… (keep in mind the cheap rotary tool worked… but it just takes longer… I bought a Rotary Carver for like $50 and it slices through porcelain like butter using the same cutting wheel as the cheaper one)… the head picture was done with my Rotary Carver. Here is a pic of the one I did using the cheaper version just so you have a reference if you ever try it.
@Koolhandjoe @sammydog01 luckily I already own a dremel with one of those flex cables.
@Koolhandjoe @sammydog01

the inner face reminds me of Achmed, the Dead Terrorist…
@Koolhandjoe
I absolutely love that creepy doll head, she has curly hair like mine.
I got one started. I may cut off her head. Or her face. Or her head and face. My husband says I can borrow his Dremmel but I need to make a run to Harbor Freight for a blade.

@sammydog01 Nicely done… love the red eye… dry-brushing looks great… homerun on that one
@Koolhandjoe Aww, thank you! I may sand off her face and try again although my new batch is bigger and may be easier to work with.
By the way if anyone wants to join in the fun I just bought a box of 12 dolls from shopgoodwill.com. Twenty dollars shipped, 19 pounds of dolls with enough bubble wrap to make a certain someone on the forum ecstatic.
@sammydog01 that’s a hell of a deal.
@RiotDemon Most of the dolls I bought were from the 1960’s to 1980’s- I hope someone enjoyed them because their value as collectibles are almost zero. At least they probably don’t contain lead or asbestos.
But I also got this thing

It scared the bejeesus out of me while unwrapping it because it plays music AND MOVES!
Yep, it’s animated and that head and those hulk sized hands wave around to Brahm’s lullabye. I need to find something special to do with her.
@RiotDemon @sammydog01 yikes… that one looks like fun
@RiotDemon @sammydog01 and i may have to start looking there… never used Goodwill online before
@Koolhandjoe @RiotDemon @sammydog01 That’s hilarious. At the very least, you need to do an intermediate step of painting the hands electric green, scattering broken bricks around it and taking a picture for us
Great tutorial! I have zero artistic talent but love seeing how everything is made. There is waaay more work involved than I had imagined.
The first time I saw anything like these was after a tour of an abandoned (haunted?) mental hospital where vendors had set up. It was damp, dark, and dreary. When I took a picture of the dolls it freaked me out because it looked like one moved. So I took more photos. Sure enough, one had a motion detector that the flash was setting off.
They monsterfied books, jewelry boxes, and even My Little Pony.
@callow Oh wow, I love that book!
@callow Very cool
@Koolhandjoe I cut off my doll’s head (it was really fun) and am trying to work out the thing you did with one doll holding the other doll’s head by the hair. I’m still figuring out how I want the murderer to look but I’m also working on hair. Any hints on styling hair? I’m trying rollers to see what happens.

@sammydog01 hair is tricky… but… if you find something round to put it on… and pour really hot water over it sometimes it will straighten out… i have heard a combo of conditioner and lotion also works but never tried it… other than that if the hair is not working for me I typically will buy a doll wig from FactoryDirectCraft.com… fairly cheap and they normally arrive in a few days… and they have a pretty large collection
@sammydog01 also… to help support the weight of the head on that one i fed some armature wire through the wig cap and made a handle that i glued to the hand of the one holding it… then i hid that with hot glue and hair
I was looking for inspiration for the doll to go with my severed head and found this. Enjoy!
https://www.nbc.com/night-gallery/video/the-doll/3965940
@sammydog01 That is amazing… good find!
@sammydog01 I love Night Gallery so much. So very, very much.
I made a friend for my severed head.

@sammydog01 Very Nice… Well done… I dig the make up job on the standing doll and the added gore around the severed neck area of the head
@sammydog01
I mean this with good intentions.

/image drew Carey show mimi
@RiotDemon @sammydog01 I mean, Mimi would rock that dress and gladly accessorize with a severed head, so what other intentions could there be?
@mossygreen @RiotDemon @Koolhsndjoe I was going for Whatever Happened to Baby Jane but it came out more Mimi with a green tint. I’ll probably play with her some. That’s the nice thing- I can just paint over. And I have a whole box of dolls left.
@RiotDemon @sammydog01 Ah, makes sense. I can’t imagine Baby Jane in color, it’s a personal failing. Maybe try the makeup over a crackle base? Or would that lean more goth clown? So many possibilities…
@mossygreen @RiotDemon I could do her over in black and white. Or just start again on a different doll.
@mossygreen @RiotDemon @sammydog01 I would say leave it… I think it is great… then as time goes on and you get better and better you can look back on that one and see how far you have come.
I found a lamp at the thrift store to play with.

@sammydog01 terrific… that is very cool… so well done…I just picked up another lamp like Jeanie was in but a little smaller… and I am looking through all my bins trying find one that says… please make me creepy and put me in a lamp
@Koolhandjoe I can’t wait to see what you come up with.
@sammydog01 Love it! Goth up the shade with some bats or something!
@sammydog01 I feel like I had that lamp shade at one point in my life.
Love the lamp.
@RiotDemon I loved that shade and bought a separate lamp to get it. It needs some fringe though. Maybe gold.
@RiotDemon @sammydog01 maybe some small gold tassels hanging down with the fringe… straight up retro
Haven’t started the lamp yet… but finished up my Wendigo tonight
@Koolhandjoe He’s spectacular! Did those horns come with the skull?
@sammydog01 Yes… it was a plastic ram skull… I think
@Koolhandjoe Cool. I like the eyeballs too. And the claws.
@sammydog01 the brown eye was left from the Scare Bear… never throw out scraps is my motto
@Koolhandjoe @sammydog01 Waste not, want not. Stunning.
@Koolhandjoe Brilliant work. I love it.
@Koolhandjoe wow! Amazing job!
@Koolhandjoe he’s fantastic!!
I was scrolling through some clickbait article from twitter and saw this. Nature is trying to take over Joe’s spot, with these wasps in a doll:
@djslack well done nature… now i must up my game
@Koolhandjoe I found the original post of this on reddit and was reading the comments there, and I believe I found a vacation destination for you: https://isladelasmunecas.com/
@djslack … now… how do i sell this to the wife?..
@djslack @Koolhandjoe
Yeah, I saw a tour of it on some TV show - definitely your kind of place!
@djslack @Kyeh i think Ghost Adventures did an episode there
I finally got around to starting. Hubby bought me new paints since I couldn’t find mine (still in a box from moving) and I have one doll that I can share before and in progress pics of. I am at a stopping point on her because I am waiting for a wig I ordered to arrive. I want to finish her “makeup” with her hair on. I am using @Koolhandjoe’s excellent tutorial for my base, but will be veering off course to do something a little different. Anyway, here’s my doll before, and then so far.
@Pony She looks really good. I’m looking forward to seeing what you do to her.
@Pony @sammydog01 Great look so far… where are you ordering the wig from if I may ask?.. I normally use Factory Direct Crafts… but always looking for new sources
@Koolhandjoe Factory Direct didn’t have the style I wanted, so I did eBay. More expensive, but I have a very specific vision in my head for this particular doll.
@Pony I will start checking ebay… I honestly don’t think I have ordered anything from ebay since the late 90’s and got scammed with some knock off Oakleys… but worth a try
@Koolhandjoe @Pony We buy items thru eBay frequently, but almost always used/vintage items that are hard to find anywhere else: t-shirts, tools, camping stuff, etc. We’ve had pretty good luck with used computers on eBay as well.
We try to keep our expectations low,
@compunaut @Koolhandjoe @Pony I ordered some little plastic skulls on etsy- probably paid too much but the write-up was funny. They came shipped in a box from an adult party game and were packed with toilet paper wrappers. Hand written thank you note too. Totally worth it.
@Koolhandjoe Crap- I forgot to update when I got the wig I wanted. I still need to make her a dress, who knows when I’ll get to that. lol but I am starting to feel like doing another one. These are fun to make!
@Pony well done… fantastic wig… i can’t wait to see the finished product… i remember my first horror doll… now 3 years later… i have 3 large Rubbermaid bins full of dolls and several bins full of wigs, eyes and other things to use during the monsterfication process… i can become a consuming hobby
@Koolhandjoe I can see how it could take over. I’m actually working on a spooky lamp now, but I need some spray paint before I can finish it.
@Pony lamps are fun too… have done 4 so far myself… i love the creepy crafting keep it up and keep sharing… so cool to see others in this hobby
@Koolhandjoe Thanks… I had dabbled with spooky crafts before, but you inspired me to try more creepy fun stuff.")
@Koolhandjoe @Pony Wow, that wig was totally worth the wait! It’s perfect with your design.
@mossygreen Thanks!")
This thread is awesome! Thanks for the tutorial Koolhandjoe! I totally want to try my hand at a creepy doll! I love what you guys have tried so far.
WORKER BEES! HERCULES! TURKEY GREASE! AWESOME!